Virtual Librarian Service (VLS) enables access to the ![]() menu item. VLS helps engineering teams create their own exclusive part libraries fast and accurately, allowing engineers to focus on innovation. VLS can be accessed via the
menu item. VLS helps engineering teams create their own exclusive part libraries fast and accurately, allowing engineers to focus on innovation. VLS can be accessed via the ![]() menu item to view, filter, and create requests, or via the
menu item to view, filter, and create requests, or via the ![]() button shown on a Manufacturer PN (MPN) to more quickly create a request for the specific MPN. VLS options will only be shown when VLS is enabled in the configuration and when you are logged into an Ultra Librarian account that has VLS access.
button shown on a Manufacturer PN (MPN) to more quickly create a request for the specific MPN. VLS options will only be shown when VLS is enabled in the configuration and when you are logged into an Ultra Librarian account that has VLS access.
 via VLS Menu Item")
Access to Virtual Librarian Service (VLS) via VLS Menu Item
 via VLS Button on a Manufacturer PN")
Access to Virtual Librarian Service (VLS) via VLS Button on a Manufacturer PN
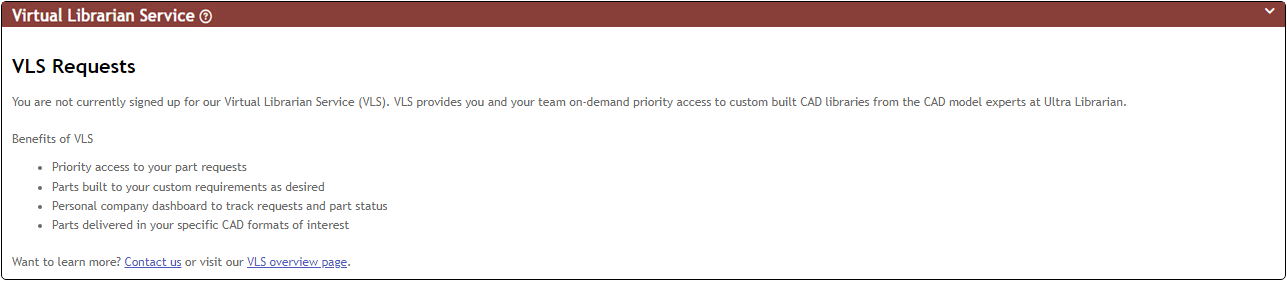
When you have enabled VLS in the configuration but are not logged into an Ultra Librarian account that has VLS access, you will see the page below.
When you have enabled VLS in the configuration and are logged into an Ultra Librarian account that has VLS access, you will see the summary page below where you can view, filter, and create requests. The page will dynamically wrap the filter and search fields based on the size of your window, so this screenshot may not appear exactly as it does for you.
Click the ![]() link in the title bar to open the User Guide to this section.
link in the title bar to open the User Guide to this section.

Note: Download functionality is not available when using the System Capture plugin.
To access the Virtual Librarian Service (VLS) menu item to view, filter, or download attachments from existing requests,
1.Click ![]() from the CIP menu bar. Your VLS request summary will be shown.
from the CIP menu bar. Your VLS request summary will be shown.
2.From there you will see your existing requests and have the option to filter them using the available pick lists and text input fields.

VLS Filter Options
a.Click the pick list(s) for the desired field(s) to filter your requests.
i.Status - All Status(es), New, Open, Closed
ii.Priorities - All Priorities, Standard, High Priority
iii.Complexity - All Complexities, High, Low, Medium, Not Set
iv.Requestor - All Requestors, or select an individual from your list of requests.
v.Timespan - Last 4 Weeks, All Time
b.Enter Manufacturer and/or (Manufacturer) Part Number to search your requests. These will filter on-the-fly so you can quickly narrow down your list of requests.
3.Review your requests and click on a specific request to open it. You have multiple options when viewing a request.
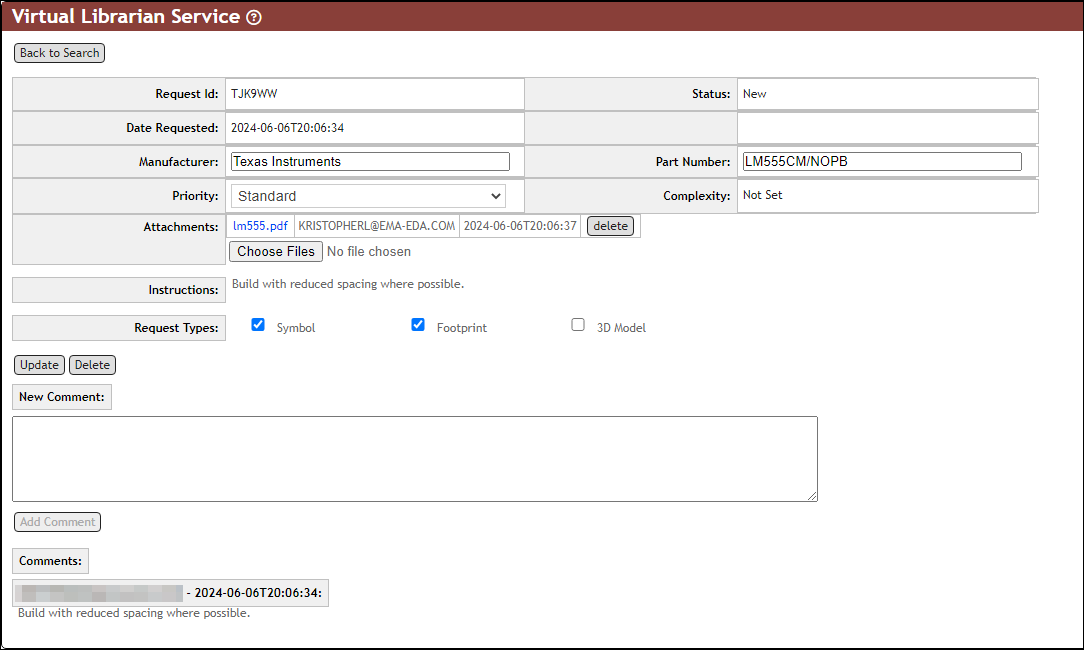
a.Update Request - You may update any of the editable fields or add new attachments, then click ![]() to update the request.
to update the request.
b.Download File Attachment - Click the attachment file name in blue text (e.g. lm555.pdf) to download it.
Note: Download functionality is not available when using the System Capture plugin.
c.Delete File Attachment - Click the ![]() button next to the file attachment you'd like to delete it. *This is only available for files that you have uploaded, not those added by others.
button next to the file attachment you'd like to delete it. *This is only available for files that you have uploaded, not those added by others.
d.Delete Request - Click the ![]() button next to the (request) Update button to delete the request. *This is only available for requests that you have created, not those added by others.
button next to the (request) Update button to delete the request. *This is only available for requests that you have created, not those added by others.
e.Add Comments - Enter a comment in the New Comment: section, then click ![]() to update the request.
to update the request.
f.Return to Summary/Search - Click ![]() when you are ready to return to the summary/search list.
when you are ready to return to the summary/search list.
To create a new VLS request from the summary page,
1.Click ![]() from the CIP menu bar. Your VLS request summary will be shown.
from the CIP menu bar. Your VLS request summary will be shown.
2.Begin a new request by clicking the ![]() button.
button.
3.Add and select appropriate information regarding your request.
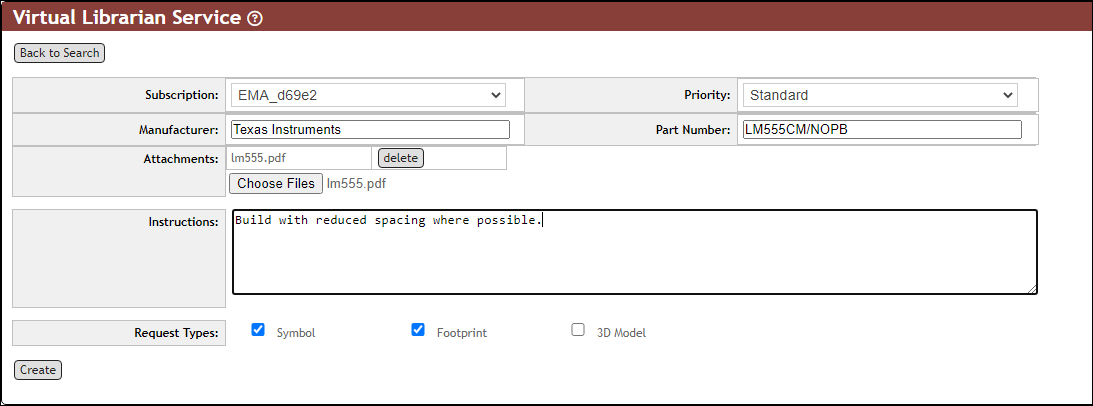
a.Subscription - Select your VLS subscription account if you have more than one. Otherwise you can skip this.
b.Priority - Select the desired request priority.
c.Manufacturer - Enter the Manufacturer for the part in question.
d.(Manufacturer) Part Number - Enter the Manufacturer PN being requested.
e.Attachments - Add associated datasheets or part specs associated with your Manufacturer PN by clicking ![]() , selecting your file, and uploading. Repeat this process to add as many attachments as needed. Click the
, selecting your file, and uploading. Repeat this process to add as many attachments as needed. Click the ![]() button to remove an attachment.
button to remove an attachment.
f.Instructions - Enter any specific instructions related to this part.
g.Request Types - Select the desired models for the request: Symbol, Footprint, or 3D Model.
4.Click the ![]() button to submit the request. After submitting the request, click
button to submit the request. After submitting the request, click ![]() when you are ready to return to the summary/search list.
when you are ready to return to the summary/search list.
To create a new VLS request from an existing part in CIP,
1.Open an existing CIP part, then scroll down to one of its Manufacturer PNs.
2.When viewing an existing CIP Manufacturer PN, click the ![]() button next to the Manufacturer PN.
button next to the Manufacturer PN.
3.The same VLS form will appear as above, pre-populated with the Manufacturer and (Manufacturer) Part Number from which you had clicked the ![]() button. Complete the form as described above, then click the
button. Complete the form as described above, then click the ![]() button to submit the request.
button to submit the request.