1.Open a schematic design page, otherwise Design Parts Sync will be disabled.
2.Invoke Design Parts Sync using one of these methods:
a.CIP menu in Capture - Select CIP > Design Parts Sync from Capture's top menu bar.

Launch Design Parts Sync from top CIP Menu
b.Schematic Page - Right-click (RMB) inside an open schematic design page, select More... > CIP: Design Parts Sync.

Launch Design Parts Sync from RMB Open Schematic Page
c.Design Parts Sync will not load if you have not set Transfer Fields to Design to OrCAD using CIP or CIP and System Capture. It must be set to one of those.

Design Parts Sync will not load if using a non-CIP option to Transfer Fields to Design
3.The Design Parts Sync will open its Summary page in a new or existing tab (if you've launched the feature and still have the tab open).
To Sync selected design parts with the CIP database, one part number at a time, with user interaction,
1.From an open Design Parts Sync tab, select the desired parts (Part References aka RefDes) to sync using the check boxes to the left of the Part Sync Status column. Each time you select a part, it will automatically select all other Part References that use the same CIP PART_NUMBER. Select/deselect the top check box to select/deselect All checkboxes that are able to be checked. The default select all/none behavior is defined in the User Settings.
Note: Design Parts that are Found - Up to Date, Found - Up to Date (TMP), etc. will not be selectable because their CIP transferred fields are already up to date so there is no action to take.
2.Click the ![]() button to display the Processing page and begin processing the selected parts.
button to display the Processing page and begin processing the selected parts.
3.The Processing page shows the first CIP PART_NUMBER, its Component View, and all the design's Part References (RefDes) that use the PART_NUMBER. The table shown is similar to the Part Status Report, except that the fields shown are specific to the (Component) View of the PART_NUMBER shown, and the top row of the table shows the field data from CIP (i.e. the correct data). The Part Sync Status shows the current sync status of each placed part and all Out of Date fields are highlighted as shown. All parts are selected by default, but individual items can be deselected if you do not wish to sync them at this time. Click ![]() to sync the selected parts on the design with the data from CIP, or click
to sync the selected parts on the design with the data from CIP, or click ![]() to skip this group of parts and go to the next one.
to skip this group of parts and go to the next one.
4.The next group of parts will appear and you'll be given the same options. Repeat step #3 until you've processed all selected parts.
Note: At any time, you may click ![]() to end the process and return to the Summary page.
to end the process and return to the Summary page.

Design Parts Sync - Sync View
a.If a PART_NUMBER in CIP contains multiple PCB_Footprint values and any of the design's parts have a footprint that does not match any of the values in CIP, it will be outlined in red and you will need to select which PCB_Footprint to use from the pick list. The ![]() button will be disabled until you choose a valid PCB_Footprint. The
button will be disabled until you choose a valid PCB_Footprint. The ![]() and
and ![]() will remain available.
will remain available.
Note: If this scenario occurs when using ![]() , the primary (first) footprint in the list of PCB_Footprint values in CIP will be used.
, the primary (first) footprint in the list of PCB_Footprint values in CIP will be used.

5.The Summary page will be refreshed, showing the applied changes in the Part Status Report.
To Automatically Sync all selected design parts with the CIP database, without user interaction,
1.From an open Design Parts Sync tab, select the desired parts to sync using the check boxes to the left of the Part Sync Status column. Each time you select a part, it will automatically select all other Part References that use the same CIP PART_NUMBER. Select/deselect the top check box to select/deselect All checkboxes that are able to be checked. The default select all/none behavior is defined in the User Settings.
Note: Design Parts that are Found - Up to Date, Found - Up to Date (TMP), etc. will not be selectable because their CIP transferred fields are already up to date so there is no action to take.
2.Click the ![]() button.
button.
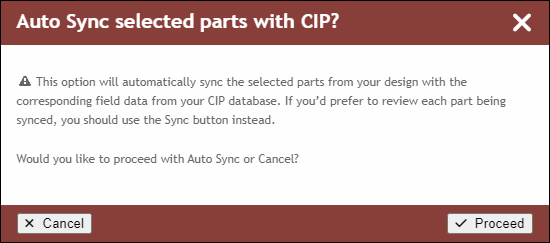
3.The confirmation pop-up dialog will appear, since this action may take a while and there is no user interaction. Review the confirmation. Click ![]() to continue with Auto Sync or click
to continue with Auto Sync or click ![]() or
or ![]() to cancel.
to cancel.
4.Once completed, the Summary page will be refreshed, showing the applied changes in the Part Status Report.