Scheduled Reports may be created from any saved Global Search. You can create multiple reports to run at different schedules.
To create a report task for a scheduled report
1.Select the Admin > Scheduled Reports menu.

Admin > Scheduled Reports
2.Click the Add a Scheduled Report button.

3.Enter the following configuration settings for your report task. The Example File Name toward the bottom will update as you enter values that affect the file name, showing how the report file name will look with your settings.
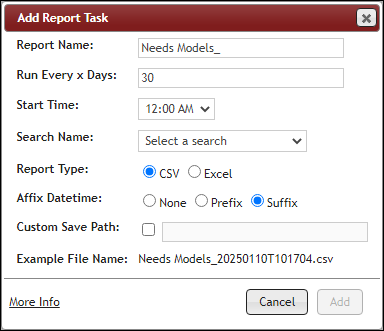
a.Report Name - Specify a file name for your report. The file name may have a date and time stamp pre- or appended.
b.Run Every x Days - Specify the periodicity of your report. Shortest period of automated reports is daily.
c.Start Time - Specify a start time to run the report, whether it be off-hours or any other time. After specifying the time, a report may be generated immediately if the report has not run within 24 hours.
d.Search Name - Any saved global searches will be available to use for your schedule report task. Select a saved global search.
e.Report Type - Specify the report format generated in Excel or CSV format.
f.Affix Datetime - Configure to include the date and time stamp as part of the output report name.
g.Custom Save Path - Select this to save the report to a location other than the default. As shown, this path is relative to the server (e.g. C:\TEMP would refer to the location on the CIP web server, not a user's machine).
Custom Save Path
4.Click the Add button to save your configuration. Your report task shows in the list of all configured report.

Scheduled Reports

Output of Scheduled Reports
To view, download or delete generated reports,
1.Click on the row with your report name. The output of a report task shows in the bottom. When you have more than 1 task configured, report for each shows as you click on each row.
2.Click the download button to download a report within a schedule task.
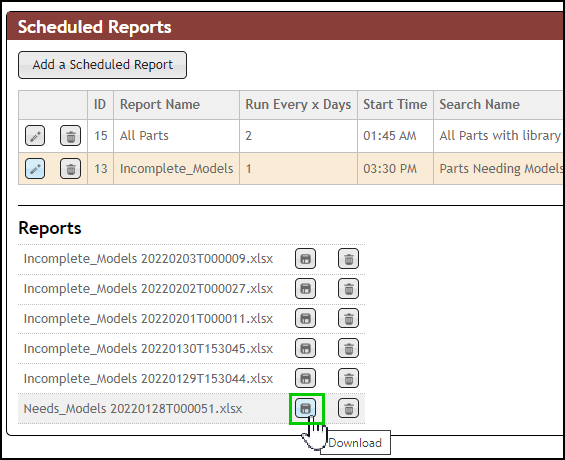
3.Click the delete button to remove a specific report. You are required to confirm before the report is deleted.
To Edit a scheduled task
1.Click the Edit, ![]() button to open the Edit Report Task form. You may change any of the information configured, including report names.
button to open the Edit Report Task form. You may change any of the information configured, including report names.
2.You may change any of the information configured during add report task. Make your changes and click Save. Note that a new report will not be generated if already created within the period specified.
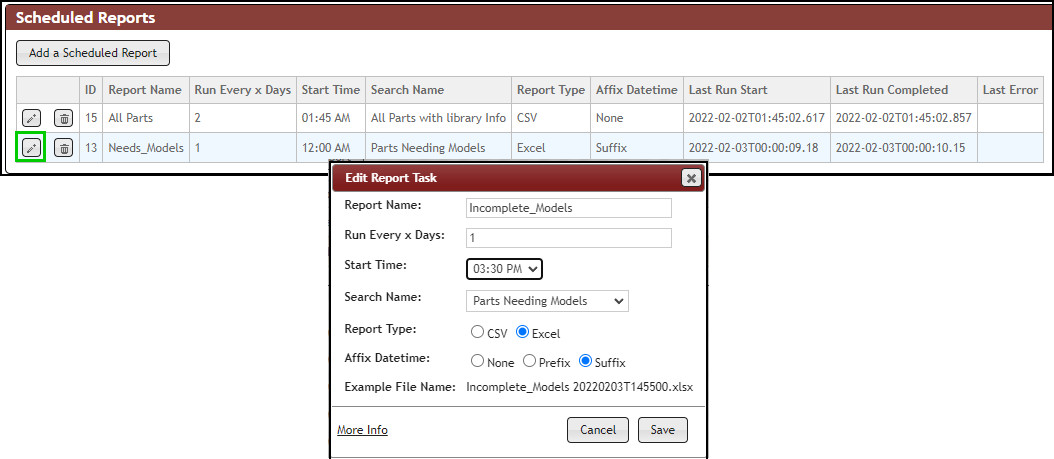
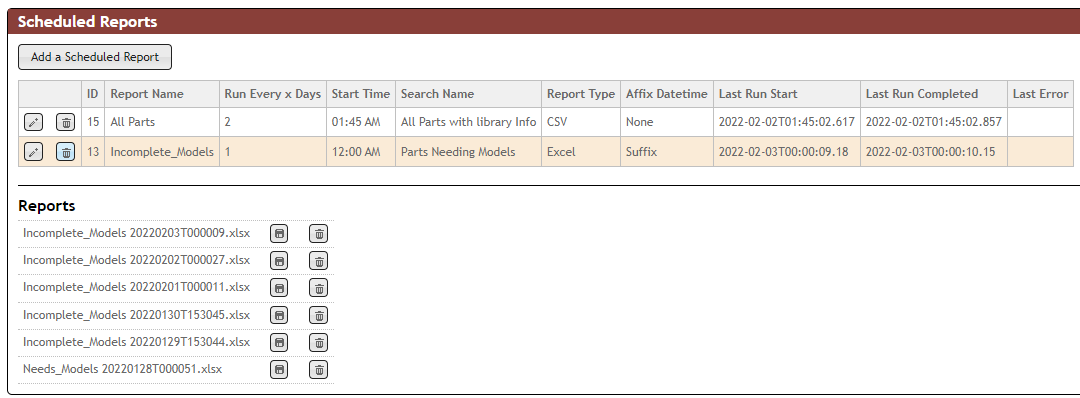
3.When date time is include in the report name of a report task, reports prior to the configuration change also shows when you click on the row of your report.
To Delete a scheduled task
1.Click the Delete, ![]() button for the report task you no longer need.
button for the report task you no longer need.

2.You are asked to confirm deletion by typing "DELETE". Once confirmed, the configuration and all reports associated to the task are removed. You will no longer have access to deleted reported.
Physical location of reports
•The default report location is on the CIP web server, under <CIP_Install_Location>\Web\Reports\ID#. The ID# can be found in the ID column in the list of Scheduled Reports. If you've configured a Custom Save Path for a report, it will be saved there.
•If access to physical files is needed to work with scripts, request that IT (or someone with permission) shares the appropriate report folder(s).
•A new ID will be create when tasks with the same report name are deleted and recreated.